
Setting up and using a breast pump for the first time can feel overwhelming, but mastering the Spectra S1 is straightforward once you understand its components and settings. As a closed-system double electric breast pump, this device is designed to prevent milk from entering the tubing or motor, ensuring a hygienic pumping experience. To get started successfully, you need to verify that all parts are clean, assemble them in the correct order, find a flange that fits your anatomy, and learn how to navigate the pump’s dual-phase settings. By taking a systematic approach to your first session, you can establish an efficient, comfortable, and stress-free pumping routine from day one.
Preparing Your Spectra S1 and Workspace
Before you begin assembly, lay out all the components of your Spectra S1 on a clean, flat surface to verify you have everything required for a session. A complete double pumping setup includes the main motor unit, two lengths of silicone tubing, two backflow protectors (each consisting of a silicone membrane, a front case, and a back case), two breast shields or flanges, two duckbill valves, and two collection bottles with caps. Taking a moment to confirm that every piece is present and completely dry prevents interruptions once you are ready to pump.
Hygiene is the most critical first step in protecting your milk supply and your baby’s health. Always wash your hands thoroughly with soap and warm water for at least 20 seconds before handling any pump parts, bottles, or your breasts. Clean the surface where you will assemble the pump with a food-safe sanitizer or a clean damp cloth to minimize the risk of introducing bacteria to the sterile components.
Products mentioned in this guide
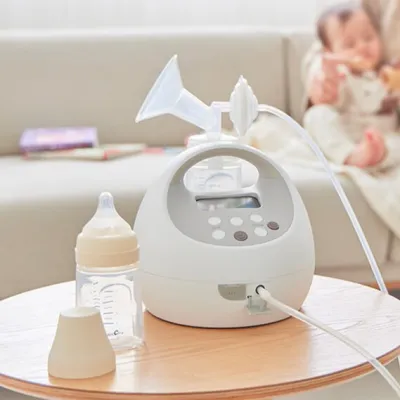

Prices are valid at publication and may change. Please refer to the product page for the latest price.
Creating a comfortable physical environment is equally vital, as stress and physical discomfort can actively inhibit your body’s let-down reflex. Choose a supportive chair where you can sit upright without straining your back or shoulders, and keep a glass of water nearby to stay hydrated. Having a warm blanket, a book, or your phone within arm’s reach helps you remain relaxed and settled throughout the session.
Finding the Right Flange Size and Fit
Using the correct flange size is essential for both comfort and efficient milk expression, as an ill-fitting breast shield can restrict milk ducts and cause tissue damage. To determine your starting size, measure the diameter of the base of your nipple in millimeters, excluding the areola, using a ruler or a printable sizing tool. This measurement should ideally be taken before a pumping session or when your nipples are in a neutral state. Add approximately two to three millimeters to your measurement to select the corresponding flange size, which allows room for the nipple to expand during suction.

Once you begin pumping, observe how your nipple behaves inside the flange tunnel to verify the fit. In a correctly sized flange, your nipple should center easily and move freely back and forth without rubbing against the sides of the tunnel. You should see little to no areola being pulled into the tunnel, and the process should feel like a firm, rhythmic tugging rather than a pinching or scraping sensation.
Conversely, a poor fit will present clear visual and physical warning signs that require immediate attention. If your nipple rubs constantly against the tunnel walls, or if a significant portion of your areola is drawn inside, the flange is likely too small or too large, respectively. Persistent pain, friction marks, white rings around the nipple, or breasts that still feel heavy and full after pumping indicate that you need to stop. If adjusting the flange size does not resolve these issues, cease use and consult a certified lactation professional to prevent injury and protect your milk supply.
Assembling the Pumping Kit Step-by-Step
Assembling the Spectra S1 correctly ensures that the closed-system barrier remains intact, protecting the motor from moisture and keeping your milk free from external contaminants. Begin by assembling the backflow protectors, which are the circular plastic pieces containing a flexible silicone membrane. Press the white silicone membrane firmly onto the plastic base, then snap the top casing over it until it clicks securely. This membrane acts as a physical barrier, ensuring that air from the pump motor never comes into contact with your breast milk.
Next, prepare the breast shield assembly by attaching the remaining parts that handle the milk flow. Push the delicate silicone duckbill valve onto the small nozzle on the underside of the flange, ensuring it fits snugly without twisting or tearing. Carefully screw the collection bottle onto the threaded bottom of the flange until it is tight, taking care not to overtighten and strip the plastic threads.
Now, connect the components to establish the vacuum path. Insert the small plastic adapter of the backflow protector into the opening on the back of the flange. Take one end of the silicone tubing and push it firmly onto the small nozzle of the backflow protector’s top casing. Connect the opposite end of the tubing to one of the air ports on the front of the Spectra S1 motor unit. If you are only pumping from one breast, ensure that the white rubber cap on the second air port is pressed firmly into place to seal the vacuum; otherwise, the pump will not generate suction. Check that all connections are flush and that the tubing is completely straight and free of kinks before powering on the device.
Operating the Spectra S1: Settings and Techniques
Operating the Spectra S1 effectively requires understanding its dual-phase technology, which mimics the natural nursing patterns of a baby. When you first turn on the pump by pressing the power button, it defaults to expression mode, but you should immediately switch to massage mode by pressing the button with the three-wave icon. Massage mode operates at a fast, shallow cycle speed of 70 cycles per minute, designed to stimulate your nerve endings and trigger the let-down reflex that starts the milk flow.
Once you observe milk dripping or spraying into the bottle—usually after one to three minutes—press the wave button again to switch to expression mode. This mode features a slower, deeper rhythm that mimics the active swallowing phase of a nursing infant. In expression mode, you can adjust both the cycle speed (ranging from 38 to 54 cycles per minute) and the vacuum strength (levels 1 through 12) using the arrow keys on the control panel.
Finding your optimal settings is a highly individual process that should always prioritize comfort over high numbers. Start with the vacuum at level 1 and gradually increase it until you reach your maximum comfortable vacuum level, then back down one step. Pumping at a level that causes pain will actually restrict your milk yield by triggering stress hormones. Center the flange over your nipple before starting, maintaining a slight forward lean so gravity helps the milk flow downward. You can also perform gentle breast massage or apply a warm compress during the session to encourage complete emptying.
Cleaning, Storing, and Maintaining Your Pump
Establishing a consistent cleaning routine after every pumping session is vital to prevent the growth of harmful bacteria and maintain the longevity of your pump parts. As soon as you finish pumping, turn off the motor, gently slide a finger under the edge of the flange to break the vacuum seal, and remove the shields from your breasts. Disassemble all parts that have come into contact with breast milk, including the flanges, duckbill valves, collection bottles, and the bottom casing of the backflow protectors if any milk bypassed the membrane.
Wash these parts promptly in warm, soapy water using a mild dish soap and a dedicated cleaning brush reserved solely for infant feeding items. Avoid washing pump parts directly in the kitchen sink; instead, use a clean, dedicated washbasin to prevent contamination from household food residue. Rinse each component thoroughly under running water to remove all soap film. While some parts may be labeled as dishwasher-safe on the top rack, hand washing is highly recommended as it minimizes wear and tear on delicate silicone components.
After washing, place all parts on a clean paper towel or a dedicated drying rack in a well-ventilated, dust-free area to air-dry completely. Never use a cloth towel to dry the parts, as this can transfer lint and bacteria. Store the completely dry components in a clean, sealed container or a zip-top bag. Inspect the silicone tubing regularly; because it is part of a closed system, it should remain completely dry and should never be washed or submerged. If you notice condensation, mold, or wear in the tubing, or if the duckbill valves lose their shape, replace them immediately to ensure safe and efficient operation.
Troubleshooting Common First-Time Issues
Experiencing technical or physical difficulties during your first few pumping sessions is common, but most issues can be resolved with a few simple checks. If you notice a sudden drop in suction or a complete loss of vacuum, start by inspecting the duckbill valves. Even a microscopic tear or a stretched opening in the silicone can compromise the pump’s ability to hold a vacuum. Ensure that the backflow protectors are pushed tightly into the flanges and that the tubing is securely connected to both the protector and the motor ports.
Another frequent issue is the appearance of moisture or condensation inside the silicone tubing. If you see tiny water droplets in the line, disconnect the tubing from the backflow protectors but leave it attached to the motor unit. Turn the pump on and let it run for a few minutes; the airflow will dry out the interior of the tubes. If you ever see milk bypass the backflow protector and enter the tubing, turn off the pump immediately, discard the contaminated tubing, and thoroughly inspect the silicone membrane for tears or improper assembly before resuming.
While minor troubleshooting can resolve mechanical issues, you must know when to stop and seek professional assistance. If the pump motor emits unusual grinding noises, fails to turn on, or if the battery casing feels excessively hot to the touch, cease use immediately and contact the manufacturer. More importantly, if you experience persistent physical pain, bleeding, or localized breast redness and warmth that does not improve with flange adjustments, stop pumping and consult a healthcare provider or a certified lactation consultant.
Frequently Asked Questions (FAQ)
How long should a typical pumping session last?
A typical pumping session generally lasts between 15 and 20 minutes per breast. You should begin in massage mode for approximately one to three minutes until you experience a let-down, then switch to expression mode for the remainder of the session. Pay attention to your milk flow rather than the clock; once the flow slows to a trickle and your breasts feel soft and light, the session is complete. Avoid pumping for longer than 20 to 25 minutes at a time, as prolonged suction can cause nipple swelling and tissue damage without yielding more milk. If you have concerns about your milk supply, consult a lactation professional rather than extending your pumping times.
Can I use the Spectra S1 while it is plugged in?
Yes, the Spectra S1 is designed to operate seamlessly while plugged directly into an electrical outlet, which also charges its internal rechargeable battery. This dual functionality allows you to use the pump even if the battery is completely depleted. Always use the official power adapter provided by the manufacturer to ensure voltage compatibility and prevent electrical damage to the unit. Inspect the power cord and adapter regularly for any signs of wear, fraying, or exposed wires. If you notice any damage to the cord, or if the adapter becomes unusually hot during charging, stop using it immediately and obtain a certified replacement from the manufacturer.

Community discussion
Share your experience or ask a question. Comments are reviewed before publication.