
Using a wearable breast pump like a Momocozy model offers modern parents a flexible, hands-free way to express breast milk while managing daily tasks. Successfully using these devices requires a clear understanding of assembly, proper flange sizing, and correct operational settings. By mastering these steps, first-time users can establish an efficient, comfortable, and hygienic pumping routine that supports their feeding goals.
Preparing for a Comfortable Pumping Session
Establishing a clean and organized environment before pumping is essential for maintaining hygiene and supporting milk expression. Wash your hands thoroughly with warm water and soap for at least twenty seconds. Clean your workspace using a dedicated sanitising wipe or a clean paper towel to prevent contamination.
Gather all the necessary components before you sit down to avoid interrupting your session. This includes your fully charged pump motor, clean and dry collection cups, silicone inserts, and a secure hands-free pumping bra. Having a clean storage container or breast milk storage bag nearby ensures you can transfer and store your milk immediately after expression.
Products mentioned in this guide
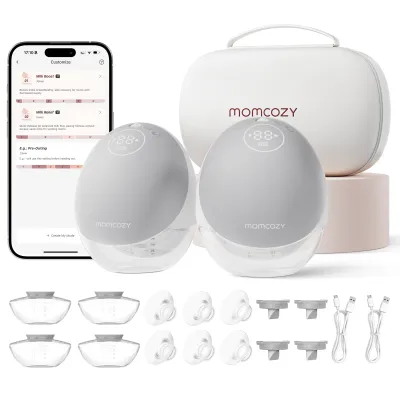
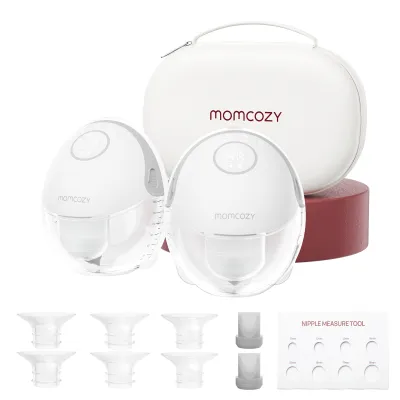
Prices are valid at publication and may change. Please refer to the product page for the latest price.
Creating a relaxing environment is highly beneficial for encouraging the let-down reflex, which is the hormonal response that allows milk to flow. Find a comfortable chair, keep a glass of water or a warm drink within reach, and minimize potential distractions. Many parents find that looking at photos of their baby or listening to calming music helps facilitate a quicker let-down.
Always consult the manufacturer’s instruction manual for your specific model before your first use. Different models may have unique battery indicators, charging requirements, or initial setup steps that are crucial for optimal performance. Familiarizing yourself with these details beforehand ensures a smooth and stress-free experience.
Assembling Your Momocozy Breast Pump Step-by-Step
Correct assembly is the foundation of a successful pumping session, as even a minor misalignment can lead to a loss of suction or milk leakage. Start by identifying all the primary components of your pump. These typically include the outer milk collector cup, the silicone flange or breast shield, the silicone diaphragm, the linker or connector piece, the double-sealed valves, and the main motor unit.

Begin the assembly process by inserting the silicone diaphragm into the linker, pressing down firmly around the edges to ensure a tight, airtight seal. Next, push the silicone valve into the bottom of the linker, making sure it is fully seated and pointing in the correct direction. Any gaps in these silicone connections will directly reduce the vacuum pressure generated by the motor.
Attach the assembled linker to the milk collector cup, ensuring it clicks or seats securely into place. Carefully press the silicone flange onto the collector cup, smoothing down the outer rim to guarantee that the seal is completely flush without any folds or lifted edges. Finally, align the motor unit with the top of the collector cup and press down until it locks securely, ensuring the power contacts or air ports align correctly.
Before every session, take a moment to inspect the integrity of all silicone parts, especially the valves and diaphragms. Look closely for any hairline tears, warping, or thinning of the material, as these small defects can cause the pump to lose suction entirely. Because assembly mechanisms can vary significantly between wearable models and traditional designs, always refer to your specific model’s official instruction manual to verify the exact connection points.
Choosing the Right Flange Size and Ensuring a Proper Fit
Finding the correct flange size is one of the most critical factors in ensuring a comfortable and productive pumping experience. An ill-fitting flange can compress milk ducts, restrict milk flow, and cause painful friction or tissue damage. To determine your size, measure the diameter of your nipple at the base using a dedicated sizing ruler or a standard measuring tool, excluding the areola.
Once you have your measurement, select a flange or silicone insert that is slightly larger than your nipple diameter, typically by two to three millimeters. This extra space allows your nipple to move freely back and forth within the tunnel during pumping without rubbing against the sides. Many wearable pumps come with multiple insert sizes, allowing you to customize the fit to your unique anatomy.
To place the flange correctly, center your nipple within the tunnel before turning on the motor. The flange should form a secure seal against your breast, with your nipple positioned directly in the middle of the opening. Ensure that your breast tissue is not folded or pinched under the silicone rim, as this can disrupt the seal and cause discomfort.
During your pumping session, observe how your nipple behaves inside the tunnel. If you notice excessive areola being pulled into the tunnel, or if your nipple rubs painfully against the walls, your flange size is likely incorrect. If you experience persistent pain, skin irritation, or a sudden drop in milk output, stop pumping immediately, reassess your sizing, and consider consulting a certified lactation professional for personalized guidance.
The Pumping Process: From Let-Down to Expression
Operating your breast pump systematically helps mimic your baby’s natural nursing patterns, leading to more efficient milk expression. Start your session by selecting the massage or stimulation mode, which features fast, shallow suction cycles. This mode is designed to stimulate the nerve endings in the breast and trigger the let-down reflex, preparing your body for milk flow.
Once your milk begins to flow or drip steadily, switch the pump to the expression mode. This mode utilizes slower, deeper suction cycles to draw milk out efficiently. Avoid the temptation to set the suction to the highest possible level immediately; higher suction does not automatically translate to more milk and can cause pain that actually inhibits your let-down. Instead, gradually increase the suction until you find your maximum comfortable level, then back down slightly.
Keep a close eye on your session duration to protect your breast tissue from overstimulation and fatigue. A typical pumping session lasts between fifteen and twenty minutes per breast, aligning with standard infant feeding intervals. Many wearable pumps feature an automatic shut-off timer after twenty or thirty minutes, but you should always monitor your comfort and stop sooner if you feel fully drained.
When you are ready to conclude your session, turn off the motor unit first to stop the vacuum generation. Gently insert a clean finger between your breast and the silicone flange to break the vacuum seal before pulling the pump away. Carefully remove the motor unit, keep the collector cup upright to prevent spills, and transfer the collected milk into a clean storage container or bag immediately.
Cleaning, Sanitizing, and Storing Your Pump Parts
Proper maintenance of your breast pump is vital for protecting your baby from harmful bacteria and ensuring the longevity of the device. Immediately after finishing your session, disassemble only the parts that come into direct contact with breast milk. The motor unit must never be washed or submerged in water, as moisture will damage the internal electrical components.
Rinse all washable parts under cool, running water to remove any residual milk film. Next, wash the parts thoroughly in warm, soapy water using a mild dish soap or a specialized baby bottle cleanser. Use a dedicated brush that is only used for baby feeding items to avoid cross-contamination from household dishes, paying close attention to the small crevices in the valves and connectors.
After washing, rinse the parts thoroughly with clean water and place them on a dedicated, clean drying rack in a well-ventilated area to air-dry completely. To sanitize your parts, follow the manufacturer’s material safety guidelines, which may include boiling the heat-resistant silicone and plastic components in water for five minutes or using a dedicated steam sterilizer. Always allow the parts to cool and dry completely before reassembling them.
Store your dry, clean pump components in a clean, dust-free container or a dedicated storage bag to protect them from environmental contaminants. Keep the motor unit in a dry place away from direct sunlight, heat sources, or potential water exposure. Regularly wiping down the exterior of the motor unit with a damp cloth is sufficient to keep it clean.
Troubleshooting Common Pumping Challenges
Encountering operational issues can be frustrating, but most common problems can be resolved with a few simple checks. If you experience a sudden loss of suction, first check all physical connections to ensure they are tight and flush. Inspect the silicone valves and diaphragms for correct alignment, and look closely for any hairline cracks in the plastic collector cups or worn-out seals.
If you are struggling with low milk output, remember that pumping efficiency is highly dependent on your physical and emotional state. Ensure you are well-hydrated, try to minimize stress, and verify that your flange size is still correct, as nipple size can change throughout your breastfeeding journey. Gently massaging your breasts before and during the session can also help stimulate milk flow and improve output.
Unusual motor noises or unexpected error codes on the digital display should be addressed by consulting the troubleshooting matrix in your user manual. Avoid attempting to open the motor casing or repair the electrical components yourself, as this can void the warranty and compromise safety.
Establish clear boundaries for when to stop using the device and seek assistance. If you experience persistent pain, skin breakdown, bleeding, or signs of a breast infection such as localized redness and fever, stop pumping immediately and consult a healthcare professional. For mechanical failures or persistent operational issues, contact the manufacturer’s customer support team for guidance or replacement parts.
Frequently Asked Questions (FAQ)
How often should I replace the silicone valves and membranes?
Silicone components are subject to wear and tear from regular use, washing, and sanitizing, which gradually reduces their elasticity and suction power. Generally, if you pump multiple times a day, you should inspect and replace these parts every one to three months. If you notice any visible stretching, tearing, warping, or a decline in pump performance, replace them immediately to maintain optimal suction.
Can I use the Momocozy breast pump while lying down?
Most wearable breast pumps are designed for upright or slightly reclined postures and should not be used while lying completely flat. Lying down can cause breast milk to flow backward into the motor unit, potentially damaging the electronics and creating hygiene issues. Always check your specific model’s instruction manual for the approved pumping angles and posture recommendations to ensure safe and leak-free operation.

Community discussion
Share your experience or ask a question. Comments are reviewed before publication.