
Installing a mosquito net tent on a baby crib requires a rigid, secure support frame, precise tensioning of the mesh fabric, and the complete elimination of loose ends or low-hanging folds that a baby could reach. In tropical environments like Singapore, where mosquitoes are active year-round and safeguarding your infant from vector-borne diseases such as dengue is a constant priority, a crib net can offer peace of mind. However, because any fabric or cord near a sleeping infant introduces potential safety risks, the installation must be executed with absolute precision. Proper setup ensures the barrier remains entirely out of your baby’s reach while preventing pests from entering the sleep space.
Pre-Installation Safety Checks for the Crib and Net
Before opening your mosquito net kit, you must verify that both the crib and the protective net are in optimal condition and fully compatible. Start by performing a thorough structural inspection of the baby crib itself. Tighten every screw, bolt, and bracket, ensuring the entire frame is stable and does not wobble when shaken. Check that the slat spacing complies with current safety standards to prevent any risk of trapping. If the crib exhibits any structural instability or damage, resolve these issues before attempting to attach any accessories.
Next, verify the design and certification of the mosquito net tent. The product must be specifically engineered and certified for baby cribs, rather than adapted from larger adult bed nets or general outdoor gear. Adult nets often feature excess fabric and lack the secure, infant-safe fastening mechanisms required for a nursery environment. Carefully inspect the netting material under a bright light, looking closely for factory defects, loose threads, or small tears. Even a minor tear can expand under tension, creating a gap for insects or a dangerous entanglement hazard for your child.
Products mentioned in this guide
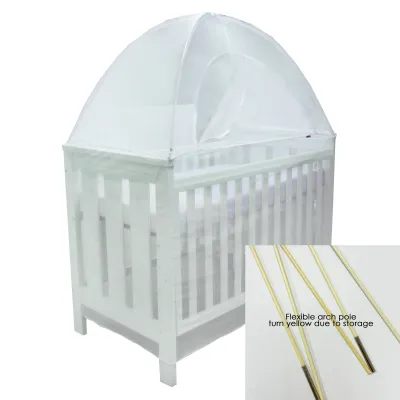

Prices are valid at publication and may change. Please refer to the product page for the latest price.
Finally, read both the crib manufacturer’s documentation and the net manufacturer’s instruction manual. Confirm that the net model is approved for use with your specific style of crib, whether it is a standard rectangular wooden crib, a convertible model, or a portable playard. Pay close attention to any stated weight, age, or developmental limits. If the manufacturer of either product warns against using canopy attachments or aftermarket netting, you must prioritize those warnings to maintain a safe sleep environment.
Essential Tools and Materials for a Secure Setup
A successful and secure installation relies on using only the correct, manufacturer-approved components. Lay out all the parts from your mosquito net tent kit on a clean, flat surface to inventory them before you begin. A standard, high-quality kit typically includes:

- Canopy hoop or top ring: The circular or arched frame that shapes the top of the tent.
- Frame poles or support rods: The vertical and horizontal segments that hold the net aloft.
- Netting fabric: The fine mesh designed to block insects.
- Manufacturer-provided fasteners: Specialized clamps, brackets, screws, or safety straps designed specifically for secure crib attachment.
For tools, keep a sturdy step stool nearby to help you safely reach higher attachment points without leaning awkwardly over the crib. You may also need a basic screwdriver if the manufacturer-provided brackets require manual tightening.
Never substitute or supplement these components with unauthorized hardware. Avoid using makeshift strings, household ribbons, ropes, cordage, or heavy-duty plastic zip ties that are not approved by the manufacturer. These non-standard items can degrade quickly, slip out of place, or present severe strangulation and choking risks if they find their way into the crib.
Step-by-Step Guide to Installing the Mosquito Net Tent
Assembling and Attaching the Frame or Hoop
To begin the physical setup, assemble the canopy hoop or support frame exactly as detailed in the manufacturer’s manual. Most modern kits use interlocking pole segments, similar to tent poles, which must slide together until they click or lock firmly into place. Ensure every joint is fully seated and secure, as a loose joint can cause the frame to sag or collapse under the weight of the mesh fabric.
Once the frame is assembled, attach it to the crib structure. Position the mounting brackets or clamps onto the crib’s headboard, footboard, or side rails as specified by the instructions. Tighten the fasteners securely, checking that they grip the wooden or metal slats firmly without slipping. If the manufacturer explicitly permits and provides specialized hardware for wall-mounting the canopy above the crib, ensure you anchor it into a wall stud using appropriate wall anchors.
The completed frame must be completely rigid and structurally stable. Shake the support poles gently to verify that they do not bend, wobble, or lean inward. Under no circumstances should the frame be capable of collapsing or falling into the crib, even if accidental pressure is applied to the outer structure.
Draping and Positioning the Mosquito Net
With the support frame securely anchored, carefully thread or drape the mosquito net fabric over the assembled hoop. Start from the top center point, aligning any reinforced seams or hanging loops with the apex of the frame. Gently pull the fabric downward, spreading it evenly across the entire structure to ensure balanced coverage on all sides.
As you position the net, monitor the tension of the mesh fabric. The netting must not be stretched too tightly, as excessive tension can distort the support frame, loosen the mounting brackets, or cause the seams of the mesh to tear. Conversely, do not allow the fabric to hang too loosely. Loose, sagging mesh creates deep folds that can easily dip into the crib’s interior, creating a hazardous environment where an infant could pull the fabric down.
Adjust the drape until the net falls symmetrically around the perimeter of the crib. There should be no uneven sections or lopsided drapes that leave one side of the sleep space exposed while leaving excess, bunched fabric on the other.
Securing and Tucking the Edges
The final phase of the physical installation involves securing the lower edges of the net to eliminate any gaps where pests could slip through. Pull the bottom of the netting downward and tuck the excess fabric firmly beneath the crib mattress. The weight of the mattress should hold the mesh tightly in place, creating a smooth, flat barrier along the inner sides of the crib.
If your specific kit includes manufacturer-provided clips, straps, or anchors, use them to secure the netting to the lower rails or legs of the crib. Ensure that these fasteners are positioned on the exterior of the crib frame, completely out of your baby’s reach. Every attachment point must be double-checked to confirm it is locked and cannot be easily undone by a curious child.
Assess the interior of the crib to ensure no loose fabric, hanging strings, or excess mesh is suspended inside the sleep space. The netting should form a taut wall on the outside of the slats, with no reachable folds on the inside. If you cannot achieve a taut, secure fit without leaving dangerous loose ends, stop the installation immediately, remove the net, and consult the manufacturer for guidance.
Post-Installation Safety Verification Checklist
Before placing your baby in the crib, you must perform a comprehensive safety audit of the completed installation. This step is critical to ensure that the protective barrier does not inadvertently introduce new hazards to the nursery.
- Perform the "reach test": Place your hand at the mattress level and simulate your baby's maximum reach from various positions, including lying down, rolling over, and sitting up. Confirm that there is no possible way for your baby to touch, grab, or pull down any part of the netting or the support frame.
- Check for sagging fabric: Inspect the area directly above the mattress. The net must remain taut and elevated, with no dipping or sagging sections that could come into contact with the baby's face or body.
- Verify fastener security: Physically tug on every bracket, clamp, clip, and screw. Ensure they are locked tight, do not slip along the crib rails, and are positioned entirely out of the baby's reach.
- Assess developmental milestones: Remember that a mosquito net tent is not a permanent fixture. You must adjust or completely remove the net tent once your baby reaches milestones such as pulling up to a standing position, pushing up on hands and knees, or showing the ability to reach the netting. At this stage of development, the risk of the child pulling the structure down or becoming entangled increases significantly, and safe sleep guidelines dictate a completely clear crib environment.
Routine Maintenance, Cleaning, and When to Replace
To keep the mosquito net tent hygienic and structurally safe over time, establish a regular maintenance routine. Dust and airborne allergens can accumulate on the fine mesh, so you should periodically remove the net for washing. Always follow the manufacturer’s care label instructions strictly. Most baby-safe nets require gentle hand washing or a delicate machine cycle in cold water, followed by air drying. Avoid high-heat dryers, which can shrink the fabric, warp the synthetic fibers, or ruin the tension required for a safe fit.
Every time you remove and reinstall the net, conduct a thorough inspection of the hardware. Check the support frame, joints, and fasteners for signs of wear, rust, cracking, or loosening. In humid climates like Singapore, metal components can occasionally develop rust, while plastic brackets may become brittle over time. Tighten any screws that have vibrated loose, and clean any dust or residue from the clamps.
You must replace the mosquito net tent immediately if you observe any of the following conditions:
- Holes or tears: Any opening in the mesh, no matter how small, compromises insect protection and can snag tiny fingers.
- Fraying edges or loose seams: Damaged stitching can unravel quickly, creating loose threads that present an entanglement hazard.
- Loss of fabric tension: If the mesh becomes stretched out and sags despite proper installation, it is no longer safe to use.
- Structural compromise: Any bent poles, cracked joints, or slipping brackets mean the frame can no longer safely support the net.
Frequently Asked Questions (FAQ)
Are mosquito net tents safe for newborns?
According to safe sleep guidelines, an infant’s sleep space should be kept completely free of loose items, soft bedding, and toys to minimize safety risks. A properly installed, taut, and securely anchored crib-specific mosquito net tent can be used safely to protect newborns from insect bites, provided the fabric and frame remain entirely outside the sleep space and out of the infant’s reach. Caregivers must strictly follow local pediatric guidelines and adhere to the manufacturer’s minimum age, weight, and developmental stage recommendations. If you have any doubts about your specific setup, consult a qualified pediatrician or child safety expert.
Can I use a regular bed mosquito net on a baby crib?
No, you should never use a standard adult bed mosquito net on a baby crib. Adult nets are designed for larger beds and contain a significant amount of excess fabric that cannot be safely tensioned or secured around a crib. This excess material creates a high risk of sagging, wrapping around the infant, or causing entanglement and suffocation. Only use mosquito nets that are specifically engineered, tested, and certified for baby cribs, as these models feature the precise dimensions and secure fastening mechanisms required to keep the mesh taut and safely away from your baby.
Community discussion
Share your experience or ask a question. Comments are reviewed before publication.