
Securing your home for a crawling or walking child requires a proactive approach to window safety, especially when living in high-rise apartments or multi-story homes. Windows are essential for natural ventilation and light, but they also represent one of the most significant fall hazards for curious toddlers. Installing reliable window locks is a practical and highly effective way to restrict window openings to a safe width while still allowing fresh air to circulate. By understanding the specific requirements of your window frames and choosing the correct locking mechanisms, you can create a secure environment that protects your family.
This step-by-step guide walks you through the process of selecting, installing, and maintaining window locks on both sliding and casement windows. Whether you are dealing with modern aluminum tracks or traditional wooden frames, taking the time to measure accurately and secure the hardware properly is essential. With the right tools and a clear plan, you can complete this home safety project efficiently and gain peace of mind.
Gather Your Tools and Compatible Window Locks
Before beginning any physical installation, gathering the correct tools and verifying the compatibility of your window locks will save time and prevent damage to your frames. The basic hand tools required for most installations include a high-quality measuring tape, a pencil for marking drill points, and screwdrivers that match the hardware provided in your lock kit. If your window frames are made of a hard material like aluminum or metal, a power drill equipped with metal-rated drill bits and a center punch will be necessary to create precise pilot holes.
Products mentioned in this guide
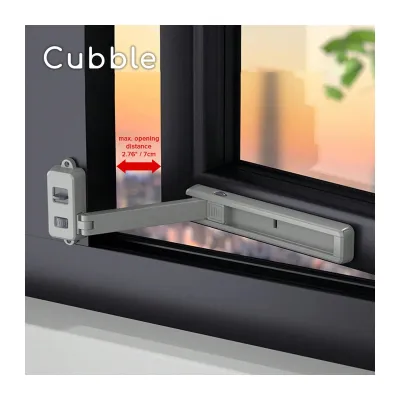
Prices are valid at publication and may change. Please refer to the product page for the latest price.
It is crucial to select a lock style that matches your specific window design. Sliding windows require track locks, clamps, or pin mechanisms that physically block the sliding panel from moving past a designated point on the track. Casement windows, which swing outward on hinges, require restrictor cables, sash jammers, or hinged arm locks that limit the swing distance of the window sash. Using the wrong lock type can result in an insecure installation or prevent the window from closing properly.
Additionally, take a close look at your window frame material to ensure you use compatible fasteners. Aluminum frames, which are standard in many modern Singapore homes, require self-tapping screws that can cut their own threads into the metal without stripping. Wooden frames are softer but prone to splitting, meaning you must pre-drill pilot holes with a small wood bit before driving in wood screws. For uPVC frames, check the manufacturer’s instructions to select screws that grip the internal steel reinforcement without cracking the outer vinyl profile.
How to Install Locks on Sliding Windows
Installing locks on sliding windows is a straightforward process that focuses on restricting the horizontal movement of the window pane. The first step is to clean the window track thoroughly using a brush or vacuum cleaner to remove any dust, debris, or insect remains. A clean track ensures that clamp-on locks can grip the metal surface firmly without slipping under pressure. Once the track is clean, slide the window open to determine the maximum safe opening distance.

To establish a safe ventilation gap, use your measuring tape to measure the opening. Child safety guidelines generally recommend restricting the opening to a gap of less than 10 centimeters, which is narrow enough to prevent a young child’s head or body from passing through. Mark this exact spot on the window track with your pencil. This mark indicates where the locking mechanism will be positioned to stop the sliding panel from opening any further.
Next, position your chosen track lock at the pencil mark. If you are using a non-drill clamp lock, slide the device onto the track rib and tighten the thumbscrew or hex key firmly. For permanent screw-in or pin locks, align the lock body with your mark and use a center punch to mark the screw holes on the aluminum track. Carefully drill pilot holes using a drill bit slightly smaller than the screws, then secure the lock body to the track using the provided self-tapping screws.
After securing the lock, perform a thorough operational check. Slide the window open until it meets the lock to ensure it stops precisely at your marked safety limit. Verify that the locking mechanism does not scratch, dent, or deform the window track during use. The window should slide smoothly up to the lock and remain firmly blocked without any wobbling, slipping, or risk of the window pane derailing from its guide rails.
How to Install Locks on Casement Windows
Casement windows present a different challenge because they swing outward, meaning wind pressure or a child pushing against the glass can exert significant leverage on the frame. Restrictor cables or heavy-duty sash locks are the most reliable options for these windows. Begin by identifying the optimal placement for the lock on the window frame and the moving sash. Mounting the lock near the middle or the lower third of the window frame typically provides the best structural leverage and keeps the release mechanism out of a toddler’s natural reach.
Hold the main lock body against the fixed window frame and the cable anchor against the moving window sash to check their alignment. Ensure that when the cable is fully extended, the window cannot open wider than the recommended 10-centimeter safety limit. Use your pencil to mark the screw hole locations on both the frame and the sash. Double-check your marks to confirm that the lock components will not interfere with the window closing and latching fully.
If you are working with aluminum frames, use a center punch to make a small indentation at each pencil mark to prevent your drill bit from slipping and scratching the frame. Drill pilot holes carefully, taking care not to drill too deep or come into contact with the glass pane inside the sash. For wooden frames, pre-drill the holes to prevent the wood from splitting. Secure the lock body and the cable anchor firmly using the appropriate screws, ensuring they are driven in straight and flush with the hardware.
Once the hardware is mounted, adjust the lock tension, latch, or key mechanism according to the manufacturer’s instructions. Test the window by opening it slowly until the restrictor cable or arm catches. The mechanism should stop the window smoothly and hold it securely against outward pressure. Ensure that the key or release button operates smoothly for adults, allowing the window to be opened fully for cleaning or emergency egress, while remaining completely inaccessible or too complex for a toddler to operate.
Test and Maintain Your Installed Window Locks
An installation is only successful if it remains secure over time, making regular testing and maintenance an essential part of your home safety routine. Immediately after installation, perform a physical push and pull test on the locked window. Apply moderate, steady pressure against the window pane to simulate a child leaning or pushing against it. The lock should hold firmly without slipping, shifting, or showing any signs of loosening from the frame.
Over time, frequent use, temperature fluctuations, and Singapore’s humid tropical climate can cause screws to loosen or metal components to corrode. Inspect your window locks at least once a month for any signs of wear, loose screws, or frame deformation. If you notice any play in the hardware, tighten the screws immediately. For locks that have become stiff or difficult to operate, apply a small amount of silicone-based lubricant to the moving parts, avoiding oil-based lubricants that can attract dust and clog the mechanism.
In addition to physical maintenance, establish clear household safety rules regarding the keys and operation of the locks. If your window locks require a key to open or disengage, store the key in a designated, secure location that is high up and completely out of sight of children. However, ensure that all adult family members and caregivers know exactly where the key is located so they can quickly open the windows in the event of an emergency, such as a fire. Always remember that window locks are a secondary layer of protection and must never replace active adult supervision.
When to Stop and Seek Professional Help
While installing window locks is a manageable DIY project for many homeowners, there are specific situations where you should stop immediately and seek professional assistance. If your windows feature tempered glass or double-glazed units where the glass extends close to the frame edge, drilling into the frame can shatter the glass or compromise the vacuum seal. In such cases, professional installation or non-drill safety options are necessary to avoid costly damage and safety hazards.
You should also avoid installing locks on frames that show signs of structural weakness, rot, or severe corrosion. A safety lock is only as strong as the frame it is attached to; mounting hardware onto a compromised frame will not provide reliable protection. If your windows do not open, close, or latch properly, or if the existing friction stays and hinges are loose, these primary mechanical issues must be repaired by a qualified technician before any safety locks can be effectively installed.
For complex window profiles, high-rise apartments with strict building management guidelines, or specialized safety requirements, it is highly advisable to consult a qualified window contractor or the manufacturer. Professional installers can ensure that your safety devices comply with local building codes and do not void your window warranties. They can also recommend heavy-duty solutions tailored to your specific home layout, ensuring maximum safety and peace of mind.
Frequently Asked Questions (FAQ)
Can I install window locks on rented apartments without damaging the frames?
Yes, tenants can secure their windows without drilling holes or causing permanent damage to the property. Clamp-style track locks are an excellent option for sliding windows, as they grip the track using pressure screws and can be easily removed when moving out. For casement windows, heavy-duty adhesive-mounted cable restrictors offer a non-destructive alternative, though their holding strength depends heavily on the quality of the adhesive and the frame surface.
Before installing any safety devices, always review your tenancy agreement and consult your landlord for permission. When using adhesive-mounted locks, clean the frame surface thoroughly with rubbing alcohol to ensure a strong bond, and test the adhesive on a small, hidden area of the frame first to ensure it will not peel off the paint or finish upon removal. Keep in mind that adhesive locks may have lower weight tolerances than screw-in models, so they require more frequent inspection.
Are window locks enough to prevent falls, or do I need window guards?
Window locks are highly effective at restricting window openings, but they should be viewed as one part of a comprehensive child safety strategy rather than a standalone solution. A lock restricts the opening distance, but it can still be bypassed if a child manages to find the key, operates the release mechanism, or if the lock fails under extreme physical force. Window guards or grilles provide a continuous physical barrier across the entire window opening, offering a much higher level of physical security.
To maximize safety in your home, consider combining window locks with sturdy window guards, especially in high-rise buildings. Additionally, always keep furniture such as beds, sofas, chairs, and toy boxes far away from windows to prevent children from climbing up to reach the sills. No safety device can replace active adult supervision, so maintaining a watchful eye on young children remains the most critical element in preventing accidental falls.
Community discussion
Share your experience or ask a question. Comments are reviewed before publication.